
Wood Grain Aluminum for Exterior: What the Finish Actually Is and When to Specify It
Low Maintenance Wall Panels for Hotels and Offices

The mood board looks resolved. The linear slatted wall panels create the rhythm you want across the accent wall. The spacing is precise. The proportions feel right. Then the project moves to execution and the complexity arrives. The contractor asks what system is being used. The supplier says they sell panels, not systems. The crew shows up and starts figuring out how to attach them. Suddenly you have visible fasteners where they shouldn’t be, misaligned spacing across the wall, and a client watching the timeline and budget slip. This is where slatted wall panels for interior design concepts meet the reality of how they actually get built.
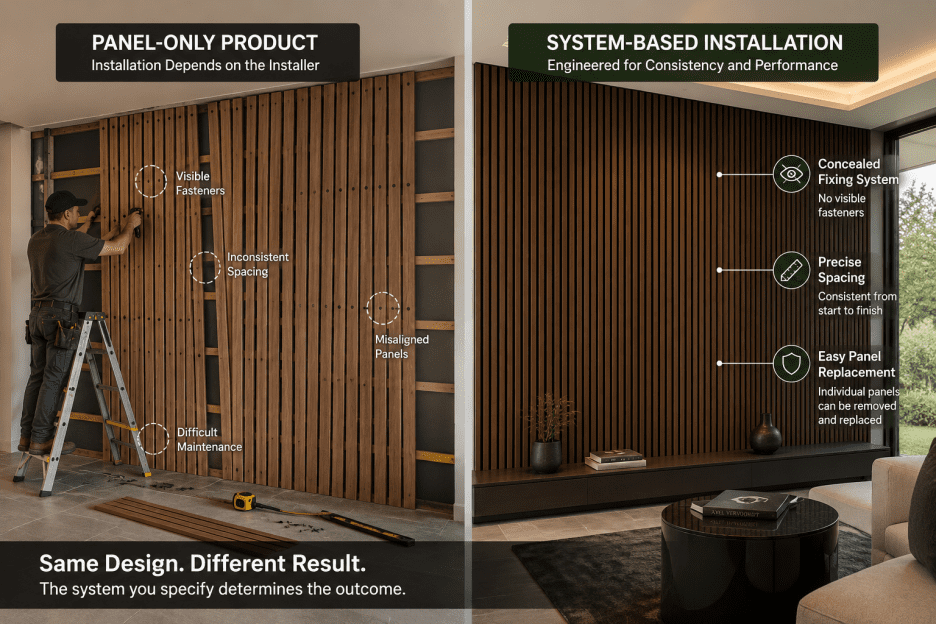
Most interior wall panel products fail at one critical point: they’re not systems. They’re panels. The fixing method, the spacing, the installation sequence, none of it is standardized. That responsibility falls to the contractor to improvise, which means every crew solves the problem differently. You end up with execution variation that undermines the design intent. The solution isn’t a better mood board. It’s choosing a system where the spacing, fastening, and installation are already engineered.
The Problem with Panel-Only Products
When you specify panels without a system, you’re asking the contractor to engineer the installation on site. How do they attach the panels? Surface-mounted screws that show. How do they keep the spacing consistent? They measure between each pair and hope. What if a panel needs to be removed later? It’s not designed for that, so removal damages the surrounding panels.
For interior design, this becomes more visible than exterior applications. You’re looking at these panels every day. Any inconsistency in spacing, any visible fastener, any misalignment shows immediately. Homeowners notice. Clients in hospitality projects notice. And by then, the design credibility is compromised.
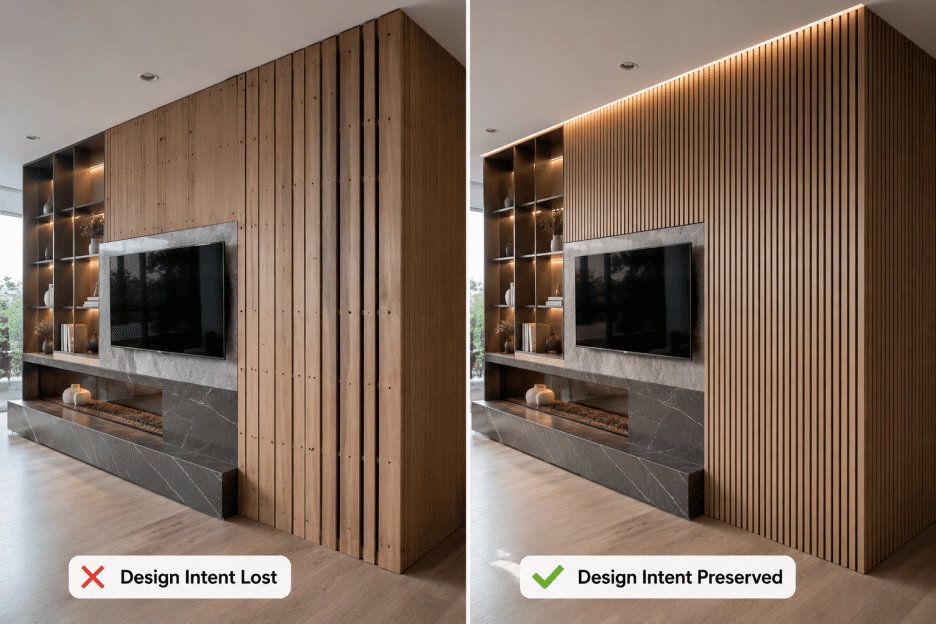
The more fundamental issue is that without a defined system, you can’t hand off clear specifications. You hand the contractor a rendering. They interpret it. Their interpretation may not match your rendering. There’s no mutual reference. The design decision was made in the design phase, but the execution happens in someone’s interpretation of that decision.
System-Based Approach
A system-based approach means the spacing is inherent to the profile geometry, not something the installer eyeballs. The fastening method is documented and consistent. The installation sequence is clear. When you specify slatted wall panels for interior design using a true system, what you designed is what gets built.
GTO’s Click System works with a rail that mounts to the wall substrate. The aluminum profiles click onto that rail. Each profile is held by the rail. The next profile covers the fasteners of the one beneath it. No visible hardware anywhere. The spacing between profiles is determined by the profile width you choose. Click 20, Click 40, Click 60 each create a different visual rhythm. You select the profile width. That becomes the spacing. It’s consistent across the entire wall.
The Universal System uses a slide-on, tongue-and-groove approach where each profile overlaps the one beneath it, fully concealing fasteners and creating a sealed joint. Both systems accomplish the same thing: the system, not the installer, controls the outcome.
Profile Selection as a Design Tool
The profile width options available in the Click System define the visual spacing. Click 20 creates a dense linear pattern with narrow gaps. Click 60 creates wider bands. Click 120 and Click 180 create even bolder rhythm. This isn’t just product options. These are design variables. You’re choosing the profile width the same way you’d choose a grid on a façade.
The Universal System offers similar flexibility. Universal 3S has three different slat sizes built into a single profile, allowing you to create pattern variety. Universal 2+2 and Universal 4+4 offer two-width and four-width combinations. These aren’t compromises. They’re design features.
For home theater walls and hospitality spaces, this profile range gives you genuine control over how the space reads. A narrow profile creates visual complexity and texture. A wider profile creates dramatic bands of color or material. The system makes these options available without requiring custom fabrication.
Ceiling Applications and Why They Matter
A significant difference between panel-only products and system-based approaches shows up in ceiling applications. Most interior wall panel systems are designed for walls. When you try to adapt them to ceilings, the fastening system fails. Gravity works differently. The fasteners need different orientation. Access changes.
The rail-and-click system from GTO works equally well on ceilings as walls. The rail can be oriented horizontally or vertically. The profiles click on regardless of orientation. This means slatted wall panels aren’t limited to walls. You can extend the linear pattern to ceilings, soffits, and even partial-height applications. The system handles all of it.
For hospitality projects with high ceilings, or residential projects where you want the linear detail to wrap from wall to ceiling, this system capability changes what’s specifiable.
Color, Finish, and Material Expression
The system handles the structure. The finishes handle the expression. GTO offers multiple finish options: solid RAL colors, wood grain finishes, matte or gloss textures. These apply to the same profiles. You can create different aesthetic effects by changing the finish without changing the system.
For an accent wall, you might choose a warm wood grain. For a home theater, a dark matte color. For a hospitality corridor, a bright solid finish. Same system. Different results. This flexibility is only possible when the system doesn’t dictate the material expression.
Edge Termination and Corner Details
Slatted wall panels for designing interior/exterior requires clean starts and ends. A linear pattern that abruptly stops at a corner or edge looks incomplete. The U10 Profile seals the edges between panels and the finish. Angle accessories handle corners. The ALEX profile provides another edge option. These details aren’t add-ons. They’re part of the system.
When the contractor has documentation for how to handle corners and edges, the wall reads as designed. When they’re improvising, you get awkward transitions. The system makes the difference between a resolved wall and a drafting exercise that didn’t translate to built reality.
Documentation and Handoff
Installation guides are available. The material calculator can estimate linear meterage from a wall area. The color guide shows finish options. When you hand the contractor these resources along with the specification, they have everything needed to execute the design accurately. There’s no interpretation required. There’s no room for creative problem-solving that solves the wrong problem.
This also protects you as the designer. You’ve specified a clear system. The contractor has clear documentation. If something goes wrong, it’s not because the specification was ambiguous. It’s because the contractor didn’t follow it.
Getting Started with the Specification
Request samples before committing to a specification. GTO’s sample boxes let you see the finishes and profile geometry in person. Understand how the spacing reads at human scale. Understand how the color varies across different light angles. Then make the specification with full information.
The specification itself is straightforward. Choose Click System or Universal System based on aesthetic preference and functional needs. Choose the profile width. Choose the finish. Call out the rail configuration.
Specify corners and edges with the appropriate Angle and U10 accessories. That’s your specification. The contractor has everything needed to execute it.
Frequently Asked Questions
Can slatted wall panels interior design work in spaces with uneven walls or substrate problems?
The rail-based system mounts to the substrate first. The rail can be shimmed to handle substrate irregularities. Once the rail is plumb and level, the profiles click on perfectly. If the wall behind is uneven, you’re not trying to force panels to conform. You’re mounting the rail to a level reference, then the profiles follow that rail. Uneven substrate is manageable. It doesn’t undermine the system.
If I want to change one damaged panel, is that possible without removing the entire run?
Yes. With the Click and Universal systems, individual panels can be removed and replaced because the fastening system allows it. You don’t have to remove surrounding panels to access one that’s damaged. This is a genuine advantage over panel-only products where removal often damages the neighboring panels. It makes maintenance and future alterations practical.
How do slatted wall panels work with built-in elements like shelves or electrical outlets?
The rail-based system gives you reference lines for planning. Built-ins can be roughed in before the panels are installed, or the rail can be worked around them. Electrical outlets require careful planning during substrate preparation. The installation guide covers these scenarios. The point is that the system is flexible enough to accommodate these elements without compromising the panel rhythm.


